Made of zirconia of the latest generation, the two-piece Patent™ Dental Implant System (Zircon Medical Management) is currently causing a stir with long-term studies that are unique in the world of dental implants. The proven long-term success of Patent™ can be attributed, among other things, to the innovative prosthetic concept for connecting the implant with the crown or bridge restoration by means of a high-tech glass fiber post.
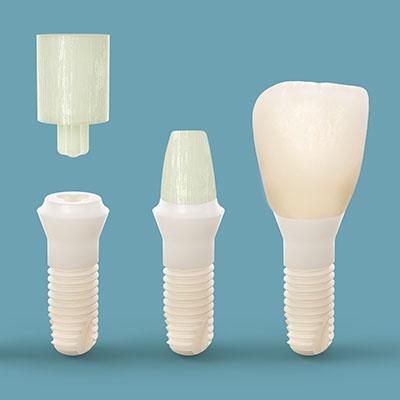
The novel glass fiber technology of the Patent™ Dental Implant System was developed in response to the high fracture rates of conventional ceramic implant systems and is in perfect harmony with the specific material properties of zirconia. The high-tech glass fiber post is inserted and cemented into the 3C platform of the inserted Patent™ Implant. Having dentin-like properties, the highly stable yet flexible post, which is prepared and restored just like a natural tooth (using a diamond drill), attenuates the masticatory forces transferred from the definitive restoration to the implant (Fig. 1). In connection with the prosthetic restoration of the Patent™ Dental Implant System, users can choose between two different workflows in daily practice.
Chairside Workflow

The chairside workflow completes the entire implant treatment within three sessions. In the first treatment session, the Patent™ Implant is placed in the patient after pre-implantological diagnostic evaluation. In the second session, the implant stability is first checked. The use of the Periotest (Gulden Medizintechnik) is recommended in this context. After removing the temporary cover of the 3C implant connection, the inserted implant is cleaned. The glass fiber post is then inserted into the connection and cemented. The use of RelyX Unicem (3M ESPE) is recommended, as this cement has proven to offer the best results in tests with all available cements. Thereafter, the cemented glass fiber post is prepared using a diamond drill – a procedure that is exactly the same as for a conventional crown or bridge preparation.
In a next step, a full impression of the jaw is taken. Within this context, the use of a retraction paste is recommended, which is applied around the implant and left for a few minutes for optimum effect. A perfect impression can then be taken without any problems. Alternatively, a scan of the implant together with the entire arch can be performed. The conventional impression or the scan data are sent to the dental laboratory where the final prosthetics are produced by the dental technician. In the third treatment session, the prosthetic restoration is delivered. The use of RelyX Unicem cement is also recommended for this procedure. The Patent™ Dental Implant System, thanks to its tissue-level implant design, makes it incredibly easy to remove excess cement, as the crown margin is located epigingivally or supragingivally. As a result, the risk of cementitis due to subgingival cement is virtually eliminated.
Dental Lab Procedure
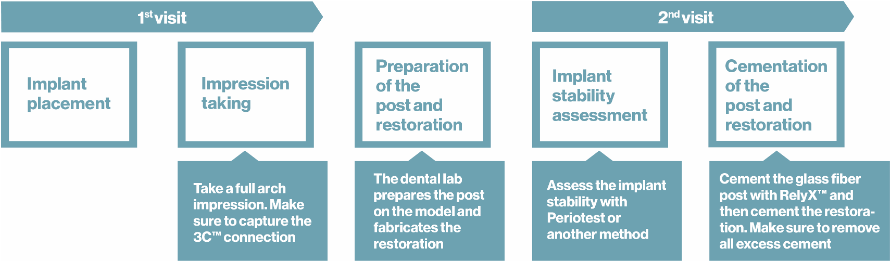
The efficient dental lab procedure completes the entire treatment in just two sessions. In the first session, the implant is placed after pre-implantological diagnostic evaluation. Immediately afterwards, a conventional impression is taken of the inserted implant or a scan is taken. Care must be taken to ensure that the 3C connection of the implant is accurately scanned (the corresponding implant size can be found in the library of the CAD/CAD system used). Patent™ employs an intraoral impression taking system, developed in collaboration with medical technology supplier Elos, that uses the 3C connection as the measuring reference rather than a scan body. This has enabled significantly faster and more accurate work in fabricating the implant restoration. This system works with the most widely used laboratory software from providers such as 3Shape, exocad and Dental Wings and saves significantly on time and costs compared with the workflows of conventional implant systems. The conventional impression or the scan data are then handed over to the dental laboratory together with the unprepared glass fiber post. There, the dental technician prepares the post using Elos Accurate Analogs for Printed Models, fabricates the prosthetics and hands over the finished components to the treating dentist.
In the second treatment session, the glass fiber post prepared in advance is inserted and cemented and fitted with a crown, for example. It is perfectly possible to cement both glass fiber post and crown together in one procedure. Excess cement can be easily and completely removed, as the epigingival or supragingival area of the implant site is easily visible. The dental lab procedure offers a high level of convenience for implant patients, as it eliminates the need for a third treatment session. In addition, this workflow creates added business value, as practitioners can devote the time they would have had to spend on a third treatment session to other patients and, at best, even implant another Patent™ Implant.